
How to Conduct a Solar Site Survey for Non-Standard Roofs: Tile, Metal, and Hip Configurations

Why Non-Standard Roofs Trip Up Even Experienced Solar Crews
A solar site survey on a standard asphalt shingle roof is straightforward. You check rafter spacing, measure the array area, pull permit docs, and you are done in under an hour. But walk up to a tile roof, a standing seam metal panel, or a multi-plane hip configuration — and every assumption you carried onto that job site stops working. Measurements get harder. Attachment points get fewer. The AHJ may have additional requirements. Miss the details during the survey, and you are looking at redesigns, permit rejections, or a failed inspection. The good news is that a solid solar site survey process built around these roof types eliminates most surprises before they cost you money.
This guide breaks down exactly how to assess non-standard roof solar configurations — from tile and metal to complex hip layouts — so your crews walk in fully prepared.
What to Do Before You Step On the Roof

Start With a Ground-Level Solar Roof Assessment
Before climbing up, your solar roof assessment starts on the ground. Pull the building permit history if available. Review satellite imagery for context. Check the AHJ’s specific requirements for the roof type — because many jurisdictions treat tile, metal, and hip roofs differently when it comes to attachment methods, fire setbacks, and load calculations.
Gear Up for Non-Standard Conditions
For the site visit, bring a moisture meter, a tile lifter tool, a digital pitch gauge, and your standard measuring kit. On non-standard roofs, you will need all of them. Arriving unprepared adds time and creates gaps in your documentation that cause problems later at permit submission.
Tile Roof Solar Installation — Survey Steps That Actually Matter

Check the Structure First
Tile roofs require the most careful survey work of any residential roof type. The tile itself is fragile — one wrong step and you are filing a damage claim before you have even designed the system. Start with a structural review. Tile roofs carry more weight than shingle roofs, so existing load capacity matters. Document truss or rafter spacing carefully. Many older homes in California, Florida, and the Southwest were built with 24-inch on-center framing, which limits your attachment points significantly.
Identify Your Attachment Strategy Early
Your solar roof assessment must note whether the tiles are nail-set or mortar-set. Mortar-set tiles take more time to remove and reinstall cleanly, which directly affects your labor estimate. During the survey, lift a few representative tiles near your planned attachment zone. Check the underlayment condition underneath. Brittle or cracked underlayment must be flagged for the homeowner and documented before contract signing.
Note the Tile Profile for Your BOM
For tile roof solar installation planning, record the tile profile height. Low-profile flat tiles allow for a different rail and clamp configuration than high-profile S-tiles. This detail changes your bill of materials — and getting it wrong on the survey means change orders in the field.
Metal Roof Solar — What Your Survey Crew Needs to Confirm
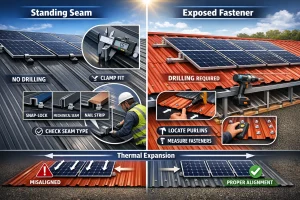
Standing Seam vs. Exposed Fastener — Two Different Surveys
Metal roofs divide into two main types: standing seam and exposed fastener — R-panel and corrugated. The survey approach is different for each. For standing seam metal roof solar work, non-penetrating clamps eliminate drilling entirely. However, your solar site survey must confirm the seam profile type — snap-lock, mechanically seamed, or nail strip — and the seam height. Clamp compatibility depends on both. Bring a seam profile reference card on every job.
For exposed fastener panels, you are drilling. Document the panel gauge, rib spacing, and existing fastener pattern. Your attachment points must align with the structural purlins beneath — not just the metal skin. Use a stud finder or magnet to locate purlin lines before marking your layout.
Account for Thermal Expansion
Thermal expansion is a real concern on metal roofs. Your survey should account for how the array will be oriented relative to the panel run direction. Improper alignment with the expansion direction causes long-term issues with mounting hardware — and that is a warranty and callback problem you do not want.
Hip Roof Solar Layout — Planning Array Geometry on Complex Planes
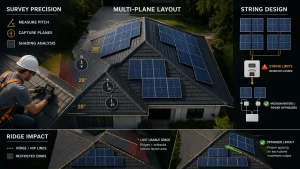
Capture Every Plane With Precision
Hip roofs are the trickiest from a design standpoint. A solar site survey on a hip roof must capture every plane, every ridge line, and every valley accurately — because your layout tool will not compensate for bad inputs. For each plane, document the pitch using a digital gauge, the usable area after all setbacks, and the compass orientation with shading obstructions noted per plane.
Plan Your String Design Around the Hip Layout
Hip roof solar layout almost always results in smaller sub-arrays across multiple planes rather than one large contiguous array. This changes your string design. If you are running a string inverter, your survey must confirm whether the available module count per plane supports a viable string length. If the numbers do not work, document it now — because that is a microinverter or power optimizer conversation to have before design, not after.
Do Not Underestimate the Diagonal Ridge Lines
Measure hip ridge lines carefully. Many installers underestimate how much the diagonal ridge eats into usable row space — especially when combined with fire setback requirements. Get those dimensions right during the solar site survey, and your permit set goes in clean on the first submission.
Common Survey Mistakes That Lead to Failed Permits
What Experienced Crews Still Get Wrong
Even seasoned installers make avoidable errors on non-standard roofs. The most common include skipping the structural load calculation review on tile roofs, particularly on older homes. Assuming clamp compatibility on metal roofs without confirming the seam profile is another frequent miss. Miscalculating available row space on hip planes by ignoring diagonal setback lines also trips up crews regularly. Finally, failing to photograph underlayment condition on tile surveys removes your documentation if a damage dispute arises later.
A thorough solar site survey process catches all of these before your permit set reaches the AHJ.
How EnergyScape Renewables Supports Your Non-Standard Roof Projects
Engineering Backup When Your Survey Data Is Solid
When your site survey data is clean but your design and permit package still needs expert engineering, that is where EnergyScape Renewables comes in. Their team produces PE-stamped structural and electrical plan sets for tile, metal, and hip roof configurations across all 50 states — with a 24-hour turnaround on most projects and a 99% AHJ approval rate. Whether you need a full permit package or a stamped structural letter for an unusual attachment method, EnergyScape builds documents that hold up at inspection.
Manage Your Pipeline With Sunscape Solar
For installers and EPCs managing multiple non-standard roof projects at once, pairing clean survey data with EnergyScape’s engineering keeps your pipeline moving without back-and-forth delays that hurt project margins. You can also manage projects, track permit status, and streamline your entire operations using Sunscape Solar — built specifically for US solar installers who need a smarter way to run their business.
sjayakanth@energyscaperenewables.com